- February 19, 2019
- Posted by: Mihir Purohit
- Categories:
Firebase is really time-saving Google product for developers, from collecting data to sending a notification to your users.
Push Notification
Push notification is some simple messages that appear with a notification in the notification tray or like a popup messaging – depends on the platform. Push Notifications are usually pushed from some backend server like Firebase in this case. It is the way to deliver users a messaging without opening the app.
Firebase Cloud Messaging
Firebase Cloud Messaging is the new version of Google Cloud Messaging or GCM. It is a cloud cross-platform messaging solution. You can use Firebase Cloud Messaging to any kind of end-user device including iOS, Android or even Web at no-cost. Firebase allows
- Notifications Messages, which are automatically handled by Firebase SDK. All you need to do is implement the Firebase SDK and start sending messages from Firebase Console
Things you need to get started
- Android Studio
- A Firebase account (you can use the same Google account – no extra sign up required)
- A real Android Device or an emulator to test your Android App.
Setup Firebase for Push Notification
There are 3 steps to Setup Firebase for your Android app notification.
- Sign up
- Create Project
- Register App
Sign up for Firebase
Before anything, you need a Firebase account.
Create Project
Now visit Firebase Console and hit ‘Add Project’. Enter Project name, select Country/region. And hit ‘Create Project’

Register App with Firebase
There are three simple steps to get your Android App Registered with Firebase
1. Register App
After your first project completed you will see a page like below. Hit ‘Add Firebase to your Android App’

Enter ‘Android package name’ & ‘App nickname’. The third field is for ‘Debug signing certificate SHA-1’ you can skip it. Hit ‘Register App’ to get your app registered with Firebase

2. Download Config Files
Hit ‘Download google-services.json’ button to download a JSON file. Save the JSON file under the app directory of your Android Studio project we recently created.

3. Add Firebase SDK
After downloading the JSON file under App Directory of your project hit Continue on Firebase Console Dialog.
In Android Studio, open build.gradle file. You will find it in the project directory. Not the one that is in your app directory. Add the following line of code inside dependencies
classpath ‘com.google.gms:google-services:3.2.0’
After adding this, you will see a yellow message, asking you to sync the project. You can ignore it at the moment. Now head over to app level build.gradle file. You will find it under app directory of your project.Add the following lines of in dependencies section
compile ‘com.google.firebase:firebase-core:11.8.0’
//Firebase Messaging library for Sending push Notifications
compile ‘com.google.firebase:firebase-messaging:11.8.0’
And at the end, outside of the dependencies section, add the following line and hit ‘Sync Now’
apply plugin: ‘com.google.gms.google-services’
That’s all we need to do in Android Studio.
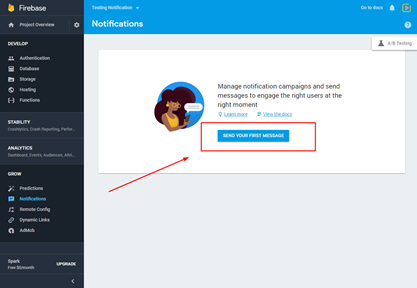
Send Notification from Firebase Console
Get back to Firebase Console. Open the Firebase project, on the left pane select ‘Notification’ .Hit ‘SEND YOUR FIRST MESSAGE’
And you will see Compose Message form, where you can enter the details.

Hitting on Test on device a pop up displays and the field labelled Add an FCM registration token, enter the registration token generated by FCM SDK obtained on initial start up of your app.

After you click Test, the targeted client device should receive the notification in the system notifications tray.
For insight into message delivery to your app, see the FCM reporting dashboard, which records the number of messages sent and opened on Android devices.