- May 15, 2021
- Posted by: Rahul Thachilath
- Categories:
NativeScript is an open-source framework for building truly native mobile apps with JavaScript or TypeScript. You can also use frameworks like Angular, React, Vue and Svelte. It lets you use your existing skills, and as a result, you get a native UI & performance on iOS and Android.
We are looking at a scenario where you can use the Angular CLI with the {N} Schematics to, either:
- create a new project with a code-sharing structure, or
- convert an existing web project to a code-sharing structure.
Then:
- convert existing components and modules to a code-sharing format, and
- generate new components and modules in a code-sharing format.
To share or not to share
The objective is to share as much code as possible, and break the platform-specific code into separate files.
This usually means that we can share the code for:
- the Routes for the navigation
- the Services for the common business logic
- the Component definition for the common behaviour of each component
While, separating the code for:
- the UI Layer (stylesheets and html) — as you need to use different user interface components in web and NativeScript-built native apps
- the NgModules — so that we can import platform-specific modules, without creating conflicts (i.e. Angular Material Design — which is web only) between web and mobile
Here’s a diagram to show you what that looks like at a high level.

Getting started
To get started you could either create a new project with a code-sharing structure. Just run ng new with @nativescript/schematics as the collection.
Just like this:
ng new –collection=@nativescript/schematics –name=my-app –shared
Note, you may need to install @nativescript/schematics first:
npm install –global @nativescript/schematics
Or we could extend an existing web projects by calling:
ng add @nativescript/schematics
This command adds the NativeScript-specific:
- npm modules
- AppModule definition
- AppComponent definition
- tsconfig
Build Process
To complete, we need a build process that is capable of using the shared files and the platform-specific ones, and provide a web or mobile app as a result.

Building for Web
To build a web app, it is “Business as usual”, just use the Angular CLI to do the job.
When you call ng serve or ng build, the Angular CLI ignores all NativeScript-specific files — as none of the web files would directly reference any .tns files.
ng serve -> serves a web app from a code-sharing project
Building for Mobile
In order to build an iOS or an Android app with NativeScript, we need to use the NativeScript CLI with the NativeScript Webpack plugin.
Call:
- tns run ios –bundle— to build an iOS app from the code-sharing project
- tns run android –bundle — to build an Android app from the code-sharing project
During the build process, Webpack takes care of providing the .tns files whenever they are available, and as a result hiding the web versions of the same files. While the NativeScript CLI is responsible for building a native mobile app.
Code Separation
Before you can start, one needs to know how to separate the web code from the mobile code.
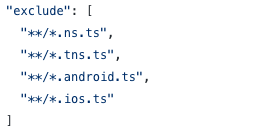
To do that we can use a simple naming convention. By adding a .tns before the file extension for NativeScript-specific, while the same file without the .tns extension is marked as web-specific. If we have just one file without the .tns extension, then this makes it a shared file.
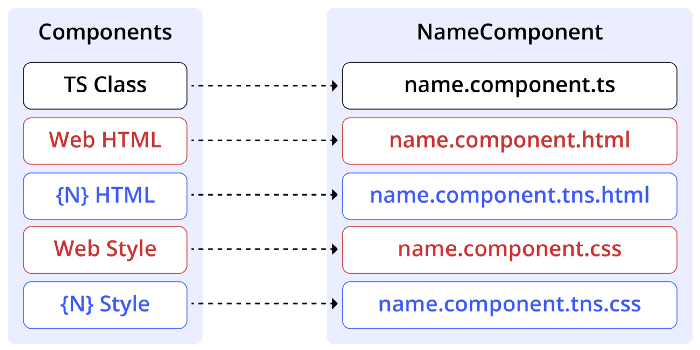
Component — Code-Sharing Format
The most common scenario is a component code. Usually we would have:
- name.component.ts — a shared file for the Component Class definition
- name.component.html — a web-specific template
- name.component.tns.html — a mobile-specific template
- name.component.css — a web-specific stylesheet
- name.component.tns.css — a mobile-specific stylesheet
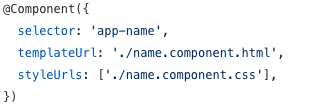
It is also worth noting that in your @Component Decorator the templateUrl and styleUrls point to files without including the .tns extension, as this is handled by the build process.
Code Separation for NgModules: HttpClient
Code separation is useful when working with NgModules, as often you need to import web- or NativeScript-specific modules.
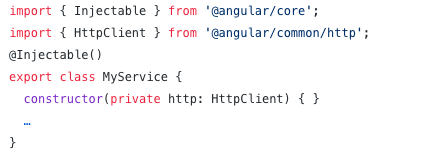
A very good example is when you need to make an HTTP call. In a web app you need to import the HttpClientModule, which provides you with the implementation for the HttpClient.
However, the way http calls are executed in a browser is different to how they work in iOS and Android. In NativeScript you should use the NativeScriptHttpClientModule, which provides us with the equivalent implementation for the HttpClient.
Now, you can use the code separation technique to create two versions of the @NgModule — each using a different version of the HttpClientModule — and then with the help of Dependency Injection provide the right implementation of the HttpClient into your service.
- my.module.ts — a web module file that imports the HttpClientModule
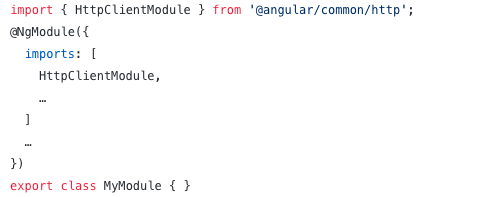
- my.module.tns.ts — a mobile module file that imports the NativeScriptHttpClientModule
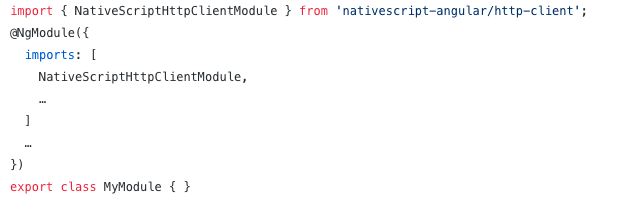
- my.service.ts — a shared service file that injects the HttpClient
Code separation for modules makes up for a simple and a quite elegant solution. It enables you to bring in functionality that has different implementation (for the web and mobile apps) under one hood and as a result maximise the shared code.
Summary
As you can see, building for both the web and mobile from a single project is fairly straightforward. You can either start with a fresh project (using ng new) or add mobile to an existing project (using ng add). There is also a simple naming convention to enable code separation, which allows you to cover many scenarios.